Saturday, January 20, 2018

Cluster Table


Step to Create Cluster Table.
Note: Whenever we create the clustered table then we must maintain the primary fields in the table clustered.
Whenever we create the clustered table then we must maintain at least one non primary key.

Creation of Cluster is two Step Process 
Step 1: Create Table Cluster.
Step 2: Create Cluster Table.

Step 1

Execute SE11.


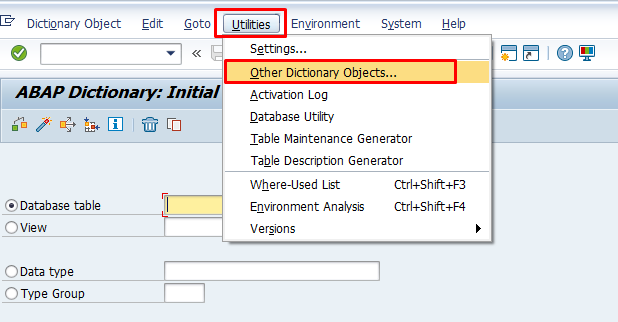
Click on Utilities and Select Other Dictionary Objects.

Select Table pool/Cluster Radio Button, Provide Table Cluster Name and Click on Create.


Select Table Cluster Radio Button and Click on Contine.

Provide Short Description.


Place the Cursor on VARKEY and Click on Delete Row


Place the Cursor on PAGE No and Click on Insert Row

Provide the our Require Field.


Click on SAVE
Click on Goto and Select the Technical Settings


Provide Size Category


Click on Save,Check and Back Button.


Step 2: Create Cluster Table
Execute SE11.

Select the Database table Radio Button and Provide Cluster Table Name.

Click on Button
Provide short Description, Delivery Class and Display/Maintenance Allowed.

Clcik on Field Tab. And Provide Same Field name as Table Cluster name and at list one field require Non Primary key Like Name1.

Click on Save Button

Click on Technical Settings

Provide Data Class and Size Category

Click on SAVE,Check and Back Button

Click on Extras and Select Enhancement Category

Select Radio Button Can be Enhanced (Deep) and Click on Copy

Click on Save, Check and Activate Table.


Create Pool Table

Step to Create Pool Table
Step 1: First we need to Create Table Pool

Step to Create Table Pool.

Execute SE11


In MENU Bar Click on Utilities and Select Other Dictionary Objects.


Select the Table Pool/Cluster Radio Button, Provide name of the Table Pool and Click on Create .

Select Table Pool Radio Button and Click on Continue.


Provide Short Description


Click on Save

Provide Your Package name or Save in Local Object


Click on Goto and Select Technical Settings.

Provide Size Category

Click on Save, Check and Back.

Click on Save, Check and Activate Table pool.

Now you See Table Pool is Activate.


Step 2: Create Pool Table.
Execute SE11

Select Database Table , Provide Table Pool name and Click on Create.


Provide Short Description, Provide Delivery Class and Select Display/Maintenance Allowed.

Provide Fieldname and Data element.

Click on Save Button

Save in our own package or Local object.

In MENU Bar Click on Extra and Select Change/ Display Table Type

Select Pooled Table and Click on Continue.

Select Delivery and Maintenance Tab and Provide Pool Table name.

Click on Technical Setting

Provide Data Class and Size category

Click on Save, Check and Back.

Click on Extras and Select Enhancement Category.

Select Can Be Enhanced and Click on Copy

Click back.

Save, Check Activate Pool Table.


Create Transparent Table


Execute SE11


Select Radio button Data Base Table, Provide Data Base Table Name and click on create Button.


Provide Short description, Delivery Class and Data Browser/ table View Maint.


Click on Fields Tab, (If Data Element is not Created then first Create Data Element and Provide Field and Data Element Name)


Here I will show you how to create Data Element.
Double Click on Data Element


Click on Yeas.


Provide Package name or You can save in local object.


Click on Yeas


Here i Will show you how to Create Domain.
Provide Short Description of Data Element
If Domain is Not Create then Provide Domain Name and Double Click on Domain Name.


Click on Yes.


Click on Yes.


Provide Short Description of Domain, Provide Data Type and Length


Save, Check , Activate Domain.


Click on Back.


Save, Check, Activate Data Element.

Click on Back


Note: Without Domain did not Create Data Element.

Here I will show you without Data Element and Domain we can create Field also.

Double Click on ZITEM Data Element


Click on Yes.


Now Select the Elementary Type Radio Button and Also select Predefined Type Radio Button and Provide Data Type, Length if you want to give Decimal Place then you give base on your Retirement.


After that Click on Field Lable Tab and Provide Field Lable
.
 Now Save, Check, Activate Data Element.

Click on Back

Note: Do same as All Field 

Note : Without Primary key we can’t create Table.

Give the Primary Field and Click on Technical Setting.

Provide Data Class and Size Category


Click on Save and Click on Back button.


Click on Extras and Select Enhancement Category


Click on Can Be enhanced(Character-type or Numeric) After that Click on Copy


Save Check Activate Table.